Moneroworld is Shutting Down! What Are We Going to Do?! OMG!
Need help setting up P2Pool with XMRig for Monero mining? You’re in the right place. With MoneroWorld shutting down, it’s more important than ever to run your own monerod, connect to P2Pool, and configure XMRig properly.
This guide covers not just the how but also the why — offering a balance between blindly copying commands and truly understanding what’s going on behind the scenes. Whether you’re new to solo mining with P2Pool or looking to migrate your Monero setup, you’ll find detailed steps and practical insight here.
If you’re in a rush, jump to the section you need using the links below. And if this guide helps, please consider tossing some XMR my way via the donation links at the bottom.
Let’s get started.
Architecture
Before we dive into the installations, here’s a quick graphic to help illustrate the architecture we will be assembling:
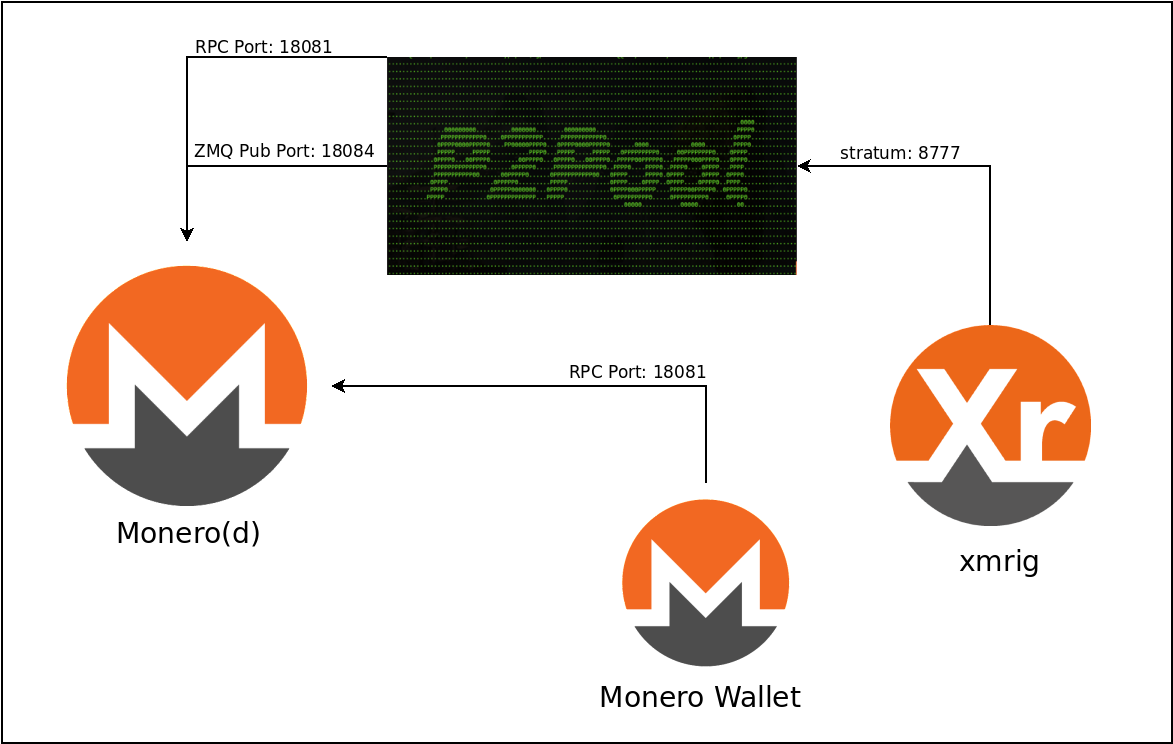
In this diagram, the Monero daemon operates and provides access to the blockchain. The p2pool software serves as a bridge to extract block templates, supplying miners with the necessary information to mine against the network. Xmrig will connect to p2pool to retrieve jobs and submit them back for the Proof of Work (PoW) chain.
It’s important to note how the wallet connects on the same RPC port. Your wallet is responsible for signing transactions that transfer your cryptocurrency. Please keep security in mind as we proceed.
Now that we have a general overview, let’s dive into the technical details and get these components installed and running!
Monero (d)
Monero (XMR) is a privacy-focused cryptocurrency, with all transactions encoded to obscure the flow of money. The mechanics behind this are beyond the scope of this guide, but I will explain how to install, configure, and set up your Monero service to operate as a daemon. This daemon is necessary for running the p2pool software, which your xmrig mining software will use to communicate with p2pool for mining against the blockchain.
Download & Install
Download Monero using the getmonero link. Once you have it downloaded, unzip it using the following commands:
    sudo mkdir -p /usr/local/crypto/monero
    sudo tar -jxvf monero-linux-x64-v0.18.1.0.tar.bz2 -C /usr/local/crypto/monero
    monero_base=/usr/local/crypto/monero/monero-x86_64-linux-gnu-v0.18.1.0
    sudo update-alternatives --install /usr/local/bin/monerod monerod $monero_base/monerod 102
      --slave /usr/local/bin/monero-wallet-cli monero-wallet-cli $monero_base/monero-wallet-cli
      --slave /usr/local/bin/monero-wallet-rpc monero-wallet-rpc $monero_base/monero-wallet-rpc
Create User Account
I prefer not to run software as my primary user or root unless absolutely necessary. It’s safer to isolate applications within their own user accounts and grant them access to needed resources. Let’s create a user account specifically for Monero.
We’ll start by creating a group, then add a user that defaults to this group:
sudo addgroup --system --gid=200 xmr
sudo adduser --gid=200 --home=/home/crypto/xmr --system xmr
Make sure you run the above commands as root. This will create a Unix account on this machine to run Monero going forward.
Configure
Next, we need to create a configuration file for our daemon. In this example, I’ll use /home/crypto/xmr/.monerod.conf as my configuration file. You can choose any name you prefer, just adjust accordingly:
#    Uncomment below to specify drive other than default.
#   data-dir=/mnt/sda/crypto
#   log-file=/mnt/sda/crypto
data-dir=/mnt/sda/crypto
log-file=/mnt/sda/crypto

p2p-bind-ip=0.0.0.0
p2p-bind-port=18080

rpc-bind-ip=0.0.0.0
rpc-bind-port=18081

prune-blockchain=true

no-igd=1
hide-my-port=1

disable-dns-checkpoints=1
enable-dns-blocklist=1

zmq-rpc-bind-ip=127.0.0.1
zmq-rpc-bind-port=18082
zmq-pub=tcp://0.0.0.0:18084
For more information on these configuration options, you can run monerod --help to print details, or visit monerod on GitHub for additional reading.
Once you’ve written this configuration file, you can start the daemon and point it to this file, allowing it to listen on the necessary ports.
Quick Breakdown of the Options:
- p2p-bind-(ip|port): These options bind the IP and port for the peer-to-peer (P2P) network. Monero operates on a P2P network to maintain the state of the network, making this program critical to its operations. This port is public, allowing nodes to communicate and locate each other.
- rpc-bind-(ip|port): These options specify the RPC client IP and port for commanding the daemon. RPC stands for Remote Procedure Call, a standard for sending commands over HTTP connections. It’s crucial to note that this port facilitates submitting transactions, validating blocks, tracking transaction history, and securing the Monero network. Be cautious not to expose this port to the internet without proper security measures, such as SSL and authentication, and consider using the
--restricted-rpcoption. - no-igd: Prevents automatic port forwarding (u-plug-n-play) with your router.
- hide-my-port: Prevents your node from being announced on the network as a receiving peer. Think of it more as “unlisted” than “hidden.”
- disable-dns-checkpoints/enable-dns-blocklist: These options are recommended based on p2pool instruction guides.
- zmq-rpc-bind-(ip|port): These options control where Monero(d) listens for ZeroMQ (ZMQ) connections.
- zmq-pub: The address for the publisher broadcasting information for p2pool. This could include block announcements, transaction data, and more from within the daemon.
With our daemon configured, let’s run Monero(d)!
Run
Let’s start the Monero daemon in the new user’s home directory!
cd /home/crypto/xmr/
Note that we are using sudo to execute the .monerod.conf under the xmr user that we created.
sudo -H -uxmr -gxmr monerod --config-file=/home/crypto/xmr/.monerod.conf
This process will take some time to gather the necessary data to catch up with the current blockchain, so we’ll return once Monero(d) has synchronized. For me it took 1 week with a cheap sata ssd. Initially I tried to use a HDD but the predicted time was 3 months! Make sure to bookmark this guide in order to return later!
Now that Monero(d) is up to date with the blockchain, let’s run p2pool against it! Note, my blockchain is 80GB at the time of writing.
P2Pool
p2pool is decentralized mining pool software that connects your Monero(d) daemon with xmrig or other mining software. It operates by using a side-chain to validate transactions, sometimes turning shares into validated blocks on the Monero chain. When you successfully mine for a period, you’ll receive a share accepted by the network, and if a block is found, you’ll get a payout directly from that block as rewards are processed immediately as part of the transaction. This is a clever way to further decentralize mining!
Download & Install
Navigate to p2pool.io and follow the link to GitHub to download the software. Choose the appropriate platform and download the compressed archive. Once downloaded, I unzipped it like so:
    mkdir /usr/local/crypto/p2pool
    tar -C /usr/local/crypto/p2pool -zxvf p2pool-v2.2.1-linux-x64.tar.gz
    update-alternatives --install /usr/local/bin/p2pool p2pool /usr/local/crypto/p2pool/p2pool-v2.2.1-linux-x64/p2pool 100
Ensure the commands above are executed as root.
Run
Now, let’s get p2pool running! Since p2pool connects to your wallet, you’ll need to locate your wallet address and incorporate it into the command like this:
sudo -H -uxmr -gxmr p2pool --wallet 42p7Qj3BgVL8tNX2aJmN5zScb2pXHGTwWjjWkT7jT97J2Kvq66BbRHHHBHDJWnCicN8ZG6heDNzZyV51wLQcGSqdQSKpN8J --host 127.0.0.1 --rpc-port 18081 --zmq-port 18082 --stratum 0.0.0.0:8777 --p2p 0.0.0.0:37889 --mini --out-peers 10 --in-peers 10
P2pool will take a few moments to start up as well. It must synchronize with the Monero network before accepting shares, but once it is live, you can share the stratum port with any miners.
Xmrig
Finally, we arrive at xmrig—the mining software. This program can utilize your CPU or GPU resources to participate in the mining pool we just established.
Download & Install
Head over to xmrig’s GitHub and download the most recent version available. Once downloaded, you can extract it in a similar manner as before:
    mkdir /usr/local/crypto/xmrig
    tar -C /usr/local/crypto/xmrig -zxvf xmrig-6.19.1-linux-x64.tar.gz
    update-alternatives --install /usr/local/bin/xmrig xmrig /usr/local/crypto/xmrig/xmrig-6.19.1-linux-x64/xmrig 100
Configure
You’ll want to configure the xmrig software with a configuration file. This file contains several settings and determines how xmrig interacts with p2pool. You can start with a sample configuration file and customize it accordingly:
{
    "pools": [
        {
            "url": "127.0.0.1:8777",
            "user": "${WALLET_ADDRESS}",
            "rig-id": "YourRigID",
            "keepalive": true
        }
    ],
    "autosave": true,
    "api": {
        "port": 9090,
        "access-token": null,
        "worker-id": null,
        "enabled": true
    }
}
Ensure you save this file as config.json in the xmrig folder you created earlier.
Run
With everything configured, it’s time to launch xmrig! In the xmrig folder, run the following command:
sudo xmrig -c .xmrig.json
Congratulations! You’ve successfully set up your Monero mining environment. If you encounter issues then feel free to reach out! Until next time, happy mining!