Introduction
Looking to flash Coreboot on your ThinkPad T420? This guide walks you step-by-step through the entire process of installing Coreboot on the T420 — unlocking features like Ivy Bridge CPU support, compatibility with various network cards, custom boot splash images, and more. Whether you’re flashing internally or externally, this tutorial will help you breathe new life into your ThinkPad!
As always, flashing firmware carries risks — proceed carefully and at your own responsibility.
Jump to…
- Setup
- Hardware Section
- Compiling Coreboot
- Custom Bootsplash Image T420 Themed
- Coreboot Settings
- Write Coreboot to Flash Chip
- Flashing Coreboot Internally to T420
Setup
Setup Raspberry Pi
In order to read/write your BIOS chip, you will need to enable certain kernel modules. (See Below)
sudo raspi-config
- Select "[5] Interfacing Options"

- Then select "P4 SPI" and "Yes" to enable it

- Optionally enable "P2 SSH" for running the pi headless

- Do the same for "P5 I2C" and enable it

- Also enable "P8 Remote GPIO" if you are using SSH
Note changes will not take effect until you reboot the PI.
sudo reboot
Prepare Computer for Building Coreboot
Note: While it is possible to build and configure Coreboot on the raspberry pi, it is not recommended. Due to to the low processing speed of all pi models (even the model 5) it will take a small eternity to build Coreboot. Therefore, you should build and configure on a more powerful device e.g a laptop or desktop running Linux. After you have built Coreboot, simply transfer to the PI and begin flashing.
Update and install necessary packages.
# For a Debian-based system
sudo apt update
sudo apt install git build-essential gnat flex bison libncurses5-dev wget zlib1g-dev unifont
# For an Arch-based system
sudo pacman -S base-devel gcc-ada flex bison ncurses wget zlib git bdf-unifont
Downloading and configuring our workspace
mkdir -p ~/work/roms
cd ~/work
# Clone the latest version of me_cleaner repo
git clone https://github.com/corna/me_cleaner
# Clone coreboot repo and update submodules
git clone https://review.coreboot.org/coreboot
cd ~/work/coreboot
git submodule update --init --checkout --progress
Binary Blobs
# Create directory for binary blobs
mkdir -p ~/work/coreboot/3rdparty/blobs/mainboard/lenovo/t420
#Build and compile ifdtool
cd ~/work/coreboot/util/ifdtool
make
Hardware Section
Disassembly Before beginning, please reference the lenovo hardware manual in order to familiarise yourself with the t420 internals. Then proceed to fully disassemble the t420.
Pinout
Carefully wire up the Pomona 5250 clip to the Raspberry Pi by using female to female jumper wires. Here is a pinout image.
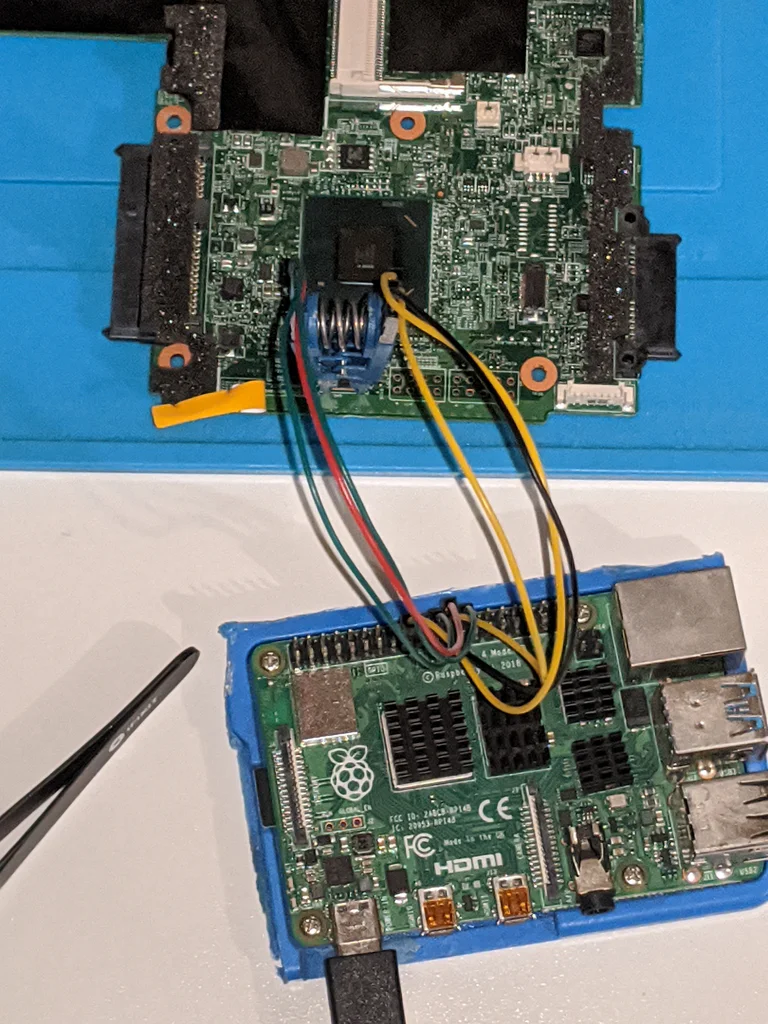
You will need six female to female jumpers wires for /CS, DO, GND, DI, CLK, and VCC.
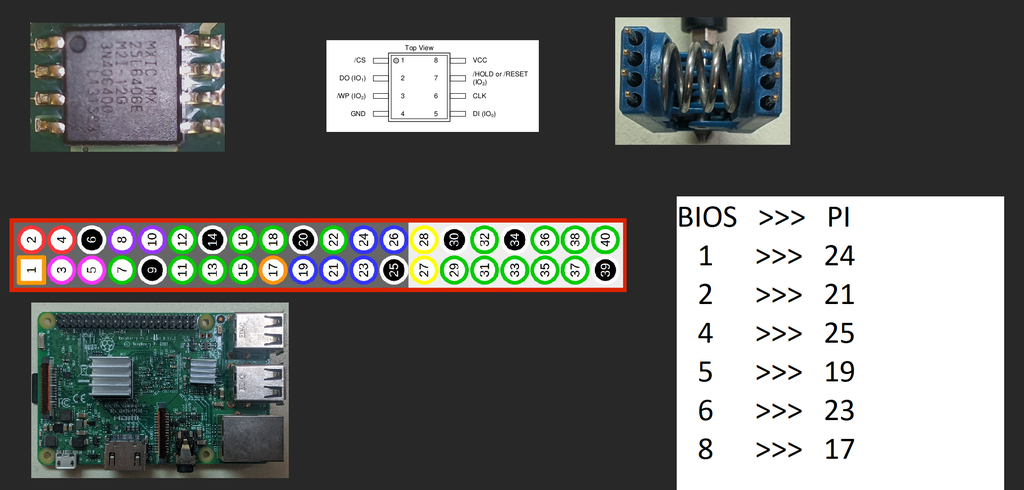
Note: VCC should be 3.3 volts, don’t use the 5 volt pin!
Read the Flash Chip
Create a roms directory and install flashrom
mkdir -p ~/work/roms
cd ~/work/roms
sudo apt install flashrom
Set SPI speeds and find flash chip name
Lower spi speeds will provide you with better reads. However,
you can increase spispeed=128 to a higher value such as
512 for faster reads. An spi speed of 128 takes roughly
10 min per read.
This will probe the chip and multiple chips may be found. You can choose any one of them as long as their checksums match later on, when you go to compare them.
sudo flashrom -p linux_spi:dev=/dev/spidev0.0,spispeed=128
Note: The above command will not work if you haven’t enabled the necessary kernel modules on the PI
Read the factory BIOS off the chip We are preforming a sanity check to ensure that our chip reads/downloads are consistent. We hope there will be no variation between any of these 3 chip reads. Therefore we will use the checksum command to compare all 3.
# Flashrom may have detected a Winbond chip or a Macronix chip, depending on the chip.
# Use the -c option to specify which chip you would like to read off of.
sudo flashrom -p linux_spi:dev=/dev/spidev0.0,spispeed=128 -c -r factory1.rom
sudo flashrom -p linux_spi:dev=/dev/spidev0.0,spispeed=128 -c -r factory2.rom
sudo flashrom -p linux_spi:dev=/dev/spidev0.0,spispeed=128 -c -r factory3.rom
Compare checksums
Very important
Make sure all the checksums are the same!
If for whatever reason they are not, head on over to https://www.coreboot.org/Board:lenovo/t420 for troubleshooting.
DO NOT CONTINUE until they all match.
sha512sum factory*.rom
There should be no output difference after running the file comparison, this means you can proceed.
Binary Blobs
Clean the Intel ME by running me_cleaner
This is often a core motivation for preforming the Coreboot flash, as this will cripple the Intel Management Engine which allows Intel employees, Governments and only God knows who else, full access to your system. It doest matter what Operating system you use, if you use Tor, Cubes OS, Tails OS, Linux, Windows, Mac OS…They still have access.
Personally, I’m not really a fan of all that, for the same reason I lock my door or close the curtains of my bedroom window each night, I simply don’t want anyone to have access to my computer!
Therefore, we shall proceed with neutering the Intel spyware.
cd ~/work/roms
cp factory1.rom cleaned.rom
python3 ~/work/me_cleaner/me_cleaner.py -S cleaned.rom
The factory1.rom should not be edited, make sure that you back it up to MULTIPLE safe locations e.g. on a USB drive or seperate device.
Extract binary blobs with ifdtool
~/work/coreboot/util/ifdtool/ifdtool -x cleaned.rom

# Rename/remove binary blobs

mv flashregion_0_flashdescriptor.bin descriptor.bin
rm flashregion_1_bios.bin
mv flashregion_2_intel_me.bin me.bin
mv flashregion_3_gbe.bin gbe.bin
#Copy blobs to coreboot directory
cp descriptor.bin me.bin gbe.bin ~/work/coreboot/3rdparty/blobs/mainboard/lenovo/t420/
Compiling coreboot
Compiling Coreboot on the Raspberry Pi will take many hours, so consider copying the ~/work/Coreboot directory to a faster computer if you are not already using one. A faster machine will significantly reduce the amount of time it will take to build Coreboot, of course it should be a Linux machine.
VGA BIOS
There are ways to compile Coreboot without the VGA BIOS firmware, but in order for SeaBios to work properly, SeaBIOS will require it. Follow below to get a pre extracted bios!
Run the following commands to download the pre-exracted VGA BIOS firmware.
cd ~/work/coreboot/
wget https://github.com/NenadStoisavljevic/t420-coreboot-guide/raw/master/snb_vbios_2170.rom
mv snb_vbios_2170.rom pci8086,0126.rom
mv snb_vbios_2170.rom pci8086,0166.rom
Notice that we have duplicated the vbios. This is because various thinkpads have different PCI numbers. Therfore when we are compiling coreboot we will add 2 bios images and define 2 different PCI numbers. This way, there will be no issues with PCI numbers. It is important that these 2 bios images are in the base corboot directory.
Custom Bootsplash Image T420 Themed
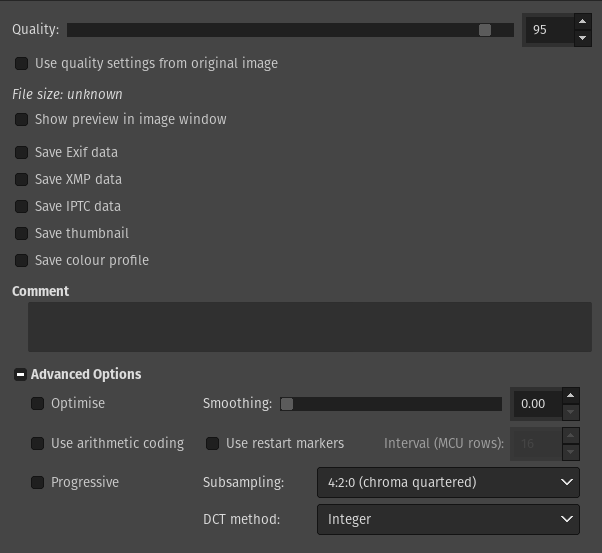
You can add a custom boot splash image (see an example below). Otherwise the screen will be blank which is quite boring! To add a boot splash image, it must be 1024×768. Name it “bootsplash.jpg” and place in the coreboot directory. Use the below encoding options in GIMP.
An example
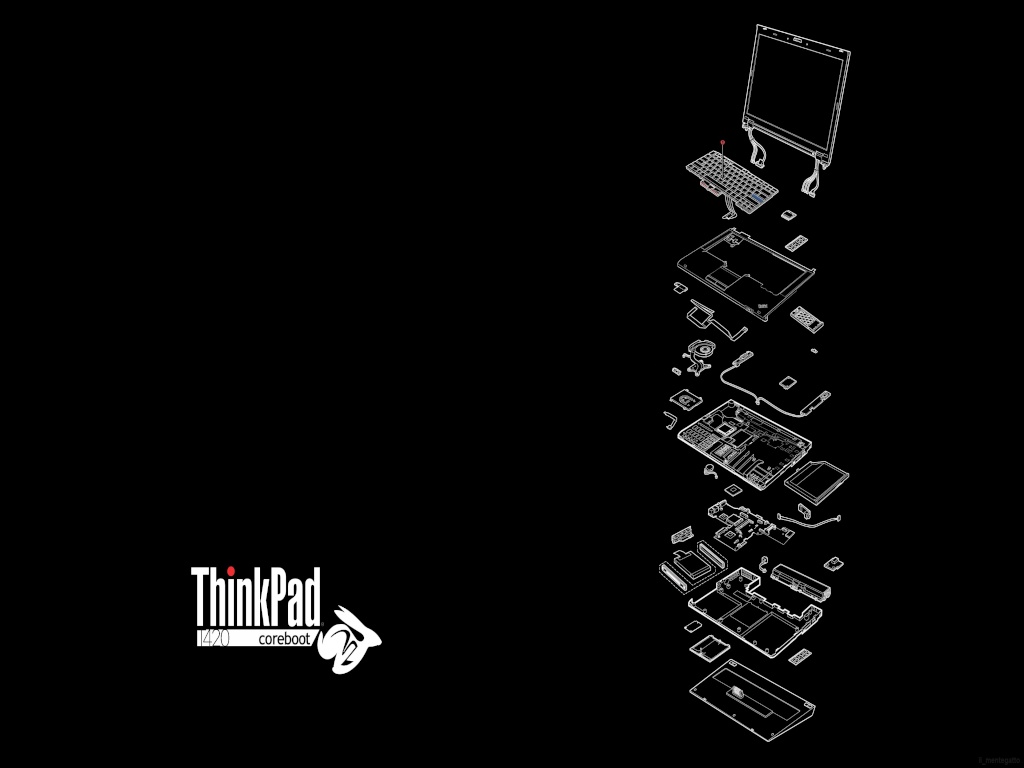
Ensure you right click the above image and download to ~/work/coreboot/
Check out the Source image! Note, the source image is not the correct resolution. Use my edited image instead.
Use GIMP to export as jpeg
Coreboot Settings
Copy the Coreboot configuration below. You can also take a look at my .config settings but you shouldn’t copy and paste into your .config file as it may cause issues!
make nconfig # Ensure your terminal is full screen or reasonably enlarged
General Setup
-------------

(20200718) Local version string
Compiler to use (GCC)  --->

[ ] Allow building with any toolchain
[ ] Use ccache to speed up (re)compilation
[ ] Test platform with include-what-you-use
[ ] Generate flashmap descriptor parser using flex and bison
[ ] Generate parsers for bincfg, sconfig and kconfig locally
    Option backend to use (Use CMOS for configuration values)  --->
[ ] Load default configuration values into CMOS on each boot
    Ramstage compression (Compress ramstage with LZ4)  --->
[*] Build a separate romstage
[*] Include the coreboot .config file into the ROM image
[*] Create a table of timestamps collected during boot
[ ] Print the timestamp values on the console
[*] Allow use of binary-only repository
[ ] Allow AMD blobs repository (with license agreement)
[ ] Allow QC blobs repository (selecting this agrees to the license!)
[ ] Code coverage support
[ ] Undefined behavior sanitizer support
[ ] Address sanitizer support
    Stage Cache for ACPI S3 resume (TSEG)  --->
[ ] Update existing coreboot.rom image
[*] Add a bootsplash image
    (bootsplash.jpg) Bootsplash path and filename
[ ] Pre-process bootsplash file with ImageMagick
[ ] Firmware Configuration Probing
    Software Bill Of Materials (SBOM)  --->


Mainboard
---------

*** Important: Run 'make distclean' before switching boards ***

Mainboard vendor (Lenovo)  --->
Mainboard model (ThinkPad T420)  --->
(ThinkPad T420) Mainboard part number
(LENOVO) Mainboard vendor name
ROM chip size (8192 KB (8 MB))  --->
System Power State after Failure (S5 Soft Off)  --->
() fmap description file in fmd format
(0x200000) Size of CBFS filesystem in ROM


Chipset
-------

*** SoC ***

*** CPU ***
[*] Enable VMX for virtualization
[*] Set IA32_FEATURE_CONTROL lock bit
[*] Lock the AES-NI enablement state
    APIC operation mode (Support both XAPIC and X2APIC)  --->
    Include CPU microcode in CBFS (Generate from tree)  --->

*** Northbridge ***
-*- Use native raminit
[*] [OVERCLOCK] Ignore CAPID fuses that limit max DRAM frequency
[ ] [OVERCLOCK] Ignore XMP max DIMMs per channel
[ ] Ignore XMP profile requested voltage
[ ] Also enable memory DLL-off mode on desktops and servers
[*] Enable ECC if supported

*** Southbridge ***
[ ] Hide MEI device on error
[*] Validate Intel firmware descriptor
[*] Lock down chipset in coreboot

*** Super I/O ***

*** Embedded Controllers ***
[*] Beep on fatal error
[*] Flash LEDs on fatal error
[*] Support bluetooth on wifi cards
[ ] Swap Fn and Ctrl keys

*** Intel Firmware ***
[*] Add Intel descriptor.bin file
    (3rdparty/blobs/mainboard/$(MAINBOARDDIR)/descriptor.bin) Path and filename of the descriptor.bin file
[*] Add Intel ME/TXE firmware
[ ] Stitch individual ME/CSE components
    (3rdparty/blobs/mainboard/$(MAINBOARDDIR)/me.bin) Path to management engine firmware
[*] Verify the integrity of the supplied ME/TXE firmware
[*] Allows HOST/CPU read access to ME region
[*] Strip down the Intel ME/TXE firmware
    *** Please test coreboot with the original, unmodified ME firmware before using me_cleaner ***
[*] Add gigabit ethernet configuration
    (3rdparty/blobs/mainboard/$(MAINBOARDDIR)/gbe.bin) Path to gigabit ethernet configuration
    Protect flash regions (Unlock flash regions)  --->
[ ] Run coreboot in long (64-bit) mode
    Bootblock behaviour (Always load fallback)  --->
[ ] Dump part of SMBIOS type17 dimm information


Devices
-------
Graphics initialization (Run VGA Option ROMs)  --->
Early (romstage) graphics initialization (None)  --->
(0) Graphics initialization delay in ms
-*- Use onboard VGA as primary video device
[*] Re-run VGA Option ROMs on S3 resume
[ ] Load Option ROMs on PCI devices
Option ROM execution type (Native mode)  --->
Display  ---> # Go into this menue
Display
-------
**[*] Set framebuffer graphics resolution**

framebuffer graphics resolution (1024x768 16.8M-color (8:8:8))  --->
Framebuffer mode (Legacy VGA text mode)  --->
Devices Continued
-----------------

[*] Allow coreboot to set optional PCI bus master bits
-*- PCI bridges
[*] Any devices
-*- Enable PCIe Common Clock
-*- Enable PCIe ASPM
[*] Enable PCIe Clock Power Management
[*] Enable PCIe ASPM L1 SubState
[ ] Support PCIe Resizable BARs
[ ] Enable Clear PCIe Lane Error Status
[*] Enable PCIe Hotplug Support
(8)   PCI Express Hotplug Buses
(0x800000) PCI Express Hotplug Memory
(0x10000000) PCI Express Hotplug Prefetch Memory
[ ]   PCI Express Hotplug Prefetch Memory Allocation below 4G boundary
(0x800) PCI Express Hotplug I/O Space
[ ] Early PCI bridge
(0x0000) Override PCI Subsystem Vendor ID
(0x0000) Override PCI Subsystem Device ID
[*] Add a VGA BIOS image
(pci8086,0126.rom) VGA BIOS path and filename
(8086,0126) VGA device PCI IDs # pci8086,0126.rom must be in the coreboot directory
[*]   Add a 2nd video BIOS image
(pci8086,0166.rom) 2nd video BIOS path and filename # pci8086,0166.rom must be in the coreboot directory
(8086,0166) Graphics device PCI IDs # Make sure to change to 8086,0166!
[ ]   Add a discrete VGA BIOS image
[*] Add a Video BIOS Table (VBT) binary to CBFS
(src/mainboard/$(MAINBOARDDIR)/data.vbt) VBT binary path and filename
[ ] Enable I2C controller emulation in software
(500000) I2C transfer timeout in microseconds
[*] Allocate resources from top down


Generic Drivers
---------------
[ ] Support for flash based event log
[ ] Enable protection on MRC settings
[ ] Support for flash based, SMM mediated data store
[ ] Disable Fast Read command
[ ] Generate ACPI code to implement TPM physical presence interface
[ ] Serial port on SuperIO
[ ] Oxford OXPCIe952
[ ] USB 2.0 EHCI debug dongle support
[ ] Support for Vital Product Data tables
[ ] Serial number in CBFS
[ ] System UUID in CBFS
[ ] Genesys Logic GL9750
[ ] Genesys Logic GL9755
[ ] Genesys Logic GL9763E
[ ] Enable AMP MAX98396
VBT Compression algorithm (Compress VBT with LZMA algorithm)  --->
[ ] NXP UWB SR1xx driver
[*] PS/2 keyboard init
[ ] Use legacy-BIOS alt-century byte in CMOS
[ ] Silicon Image SIL3114
[*] Support Intel PCI-e WiFi adapters
[*] Support MediaTek PCI-e WiFi adapters


Security
--------

CBFS verification  --->
Verified Boot (vboot)  --->
Trusted Platform Module  ---
Memory initialization  --->
[ ] Intel TXT support
[ ] Enable STM
Boot media protection mechan
[ ] Boot media only writable in

Console
-------

[*] Enable early (bootblock) console output.
[*] Enable console output during postcar.
[*] Squelch AP CPUs from early console.
[ ] spkmodem (console on speaker) console output
[ ] Network console over NE2000 compatible Ethernet adapter
[*] Send console output to a CBMEM buffer
(0x20000) Room allocated for console output in CBMEM
[ ]   Dump CBMEM console on resets
[ ] SPI Flash console output
[ ] SMBus console output
Default console log level (7: DEBUG)  --->
[*] Use loglevel prefix to indicate line loglevel
[*] Use ANSI escape sequences for console highlighting
[ ] Don't show any POST codes
[ ]   Store post codes in CMOS for debugging
[*]   Show POST codes on the debug console
[*]   Send POST codes to an external device
Device to send POST codes to (None)  --->
[*] Send POST codes to an IO port
(0x80) IO port for POST codes


System tables
-------------

[*] Generate SMBIOS tables
(coreboot) SMBIOS BIOS Vendor name


Payload
-------

[ ] Don't add a payload
Payload to add (SeaBIOS)  --->
GRUB2 version (2.12)  --->
()    Extra modules to include in GRUB image
[ ]   Include GRUB2 runtime config file into ROM image
SeaBIOS version (master)  --->
(3000) PS/2 keyboard controller initialization timeout (milliseconds)
[*]   Hardware init during option ROM execution
[*]   Hardware Interrupts
()    SeaBIOS config file
()    SeaBIOS bootorder file
[ ]   Add SeaBIOS sercon-port file to CBFS
(-1)  SeaBIOS debug level (verbosity)
*** Using default SeaBIOS log level ***
[ ]   Add a PXE ROM
Payload compression algorithm (Use LZMA compression for payloads)  --->
[*]   Use LZMA compression for secondary payloads
Secondary Payloads  ---> Enter this Menue
Secondary Payloads
------------------
[*] Load coreinfo as a secondary payload
[*] Load GRUB2 as a secondary payload
[*] Load Memtest86+ as a secondary payload
[*] Load nvramcui as a secondary payload
[*] Load tint as a secondary payload
[ ] Load coreDOOM as a secondary payload

*** Memtest86+ ***
Memtest86+ 5/6 (Memtest86+ V6)  --->
Target architecture (64 bit)  --->
Memtest86+ revision (Stable)  --->
    Debugging settings
    ------------------
*** CPU Debug Settings ***
[ ] Display intermediate MTRR settings
*** Vendorcode Debug Settings ***
*** BLOB Debug Settings ***
*** General Debug Settings ***
[ ] Halt when hitting a BUG() or assertion error
[ ] Output verbose CBFS debug messages
[ ] Output verbose RAM init debug messages
[ ] Output verbose SMBus debug messages
[ ] Output verbose SMI debug messages
[ ] Output verbose malloc debug messages
[ ] Debug console initialisation code
[ ] Enable debug messages for option ROM execution
[ ] Output verbose SPI flash debug messages
[ ] Debug boot state machine
[ ] Compile debug code in Ada sources
[ ] Configure image for EM100 usage
[ ] Print out ACPI tables in ACPICA compatible format
Build Coreboot
Replace X with the number of threads your CPU has to more efficiently distribute the load.
make crossgcc-i386 CPUS=X
make iasl
make # The coreboot rom will be saved to ~/work/coreboot/build/coreboot.rom if successful.
If python is not properly linked in your system then you need to run the following
sudo ln -s /usr/bin/python3 /usr/bin/python
Write Coreboot to Flash Chip
Change to roms directory
cd ~/work/roms
Probe flash chip to make sure it is detected
sudo flashrom -p linux_spi:dev=/dev/spidev0.0,spispeed=128
Write the coreboot rom to flash chip
sudo flashrom -p linux_spi:dev=/dev/spidev0.0,spispeed=128 -c -w coreboot.rom # If you get "Erasing and writing flash chip... FAILED" once, that is # supposed to happen, nothing to worry about.
Conclusion
After the write has been verified, you can proceed to power off the Raspberry Pi by running
But dont forget to Celebrate with some Star Wars!
telnet towel.blinkenlights.nl
sudo poweroff.
If you have not been successful, be sure to check your connections and attempt a re-flash.
If that doesn’t work, then try re-compiling coreboot and attempt another re-flash.
Lastly, if all else FAILS you can always re-flash factory1.rom by using the same write command. This was the original bios that we backed up in the initial steps.
Flashing Coreboot Internally to T420
If you have been successful and want to change some Seabios settings in the future, you dont need to repeat the entire disassembly. Now you can just run the following to re flash your bios chip on the T420 itself!
No raspberry PI required! (Only if T420 is running Linux)
sudo flashrom -p internal # Continue from the guide as if you were using a raspberry pi
For example my chip is W25164.V so I run the following on my T420 when copying the chip bios.
sudo flashrom -p internal -c W25Q64.V -r factory1.bin
Then when you have built your coreboot rom run the following
cd ~/work/coreboot/

sudo flashrom -p internal -w build/coreboot.rom
Other Useful Information coreboot’s wiki for the official documentation on the process.
tripcode!Q/7’s video for how to install IVYBRIDGE CPUs
Jump to…